
There’s a lot to BrightGauge. While some customers may request more features, most are looking for more shortcuts; a simpler experience. With that in mind, this week we’re focusing on an oft-underutilized time saver: Dashboard Filters.
As a fairly new user myself, I’m constantly discovering new capabilities within our app. When I was familiarizing myself with how everything worked, I found myself returning to the question of when was best to use a Dashboard filter versus creating a new gauge.
Dashboard Filters
These come in handy when you're looking to modify multiple gauges across your dashboard to see previous trends or get client specific. Dashboard filters are applied when you want to quickly toggle to another date range or view stats for a specific team member or client without having to build a specific gauge for them.
Most used Dashboard Filters
Filter by agent OR client -- This is used when you want to view a set of gauges with an individual client or team member in mind. Instead of making a specific dashboard for each employee or customer, use this is as a shortcut to view a team member's support stats or how many resources a client is pulling from your company.
Toggling between date ranges -- Compare project and ticket statistics like kill rate, churn rate, and anything else you'd like to compare across this month, last month, and with some datasets, within the last 120 days.
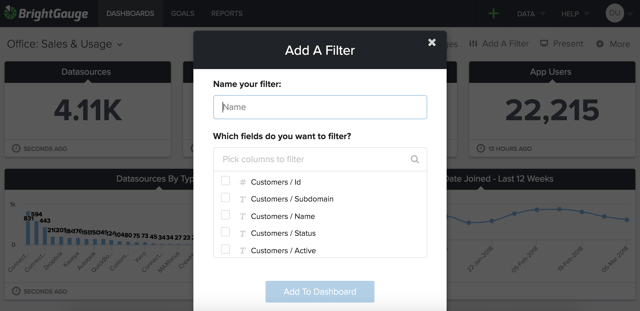
How to set up Dashboard Filters
To apply a filter to a dashboard, you can either update an existing dashboard or clone a dashboard. When you create a dashboard filter, it's specific to that individual dashboard(unless you choose to clone one with existing filters in place).
Most filters are created for sharing one dashboard with multiple clients. If you're monitoring the same gauges for multiple clients, then this is a must for you! To do this, clone the dashboard you'd like to share, then apply a filter to make the gauges shown specific to that client. Rename the dashboard, and you're ready to give that customer Viewer access to that dashboard.
When adding a filter you're prompted to select which fields you'd like to apply it to. *Note that any field selected, its corresponding dataset will also have the filter applied ie. all gauges associated with that dataset on that dashboard will also have the filter applied to them.
If you want to only apply a filter to one or two gauges, and they're linked to a dataset that's tied to even more gauges within that dashboard, then create a new gauge or modify an existing one.
Tip: looking for an easy way to tell if your dashboard filters are on? Just look for the green triangle in the upper-right-hand-corner of each gauge!
Gauge Building
So you've found that while your dashboard filter is helpful, it covers a little too much. As mentioned in the previous section, once you apply a filter to one gauge, any other gauge there belonging to the same dataset will also be filtered.
For this instance, it's best to create or modify an existing gauge. It's important to note modifying an existing gauge leads it to appear differently across any report, dashboard, or goal list where it's in use. First check the Usage panel in the gauge builder to see which dashboards and reports are already using it. Your best bet is to just copy the gauge, change its name, and then update your filters from there. Saving it as a new one will avoid overriding one of the defaults or existing gauges that may be in use by another teammate.
Using a Dashboard Filter with a Gauge that's Filtered
It's a BrightGauge tongue twister! Really, I don't want you to miss all of the cool details that have gone into making your BrightGauge so customizable. The main tip here is even with a gauge filter in place, any dashboard filter applied will override any gauge filters.
If you'd like to learn more about best practices in setting up your dashboards, reach out to our Customer Success team.
Featured image credit: Tony Babel

Free MSA Template
Whether you’re planning your first managed services agreement, or you’re ready to overhaul your existing version, we've got you covered!