
While it’s always hard to see someone leave a team or move on, it can be a harsh reality once you jump into what they’ve left behind. Often, you’re left with tasks left undone or a lack of documentation to follow. When planned right, platform and process handoffs should come with a clear overview and instructions for each use case across teams and individuals.
Keeping tidy documentation can be tough, especially when you’re a small shop running single team members in multiple roles. We’ve put together this checklist to help any new or existing BrightGauge partners get up to speed on where to begin with organizing and working within an existing BrightGauge buildout.
Taking over an existing BrightGauge account
If you are new to BrightGauge or have just been assigned as the primary account user on an existing account, follow these tips and steps to get started.
- Overview video - This quick video gives a great high-level overview of what BrightGauge offers. Watch the video - only 4 minutes! Share with any team members you may want to onboard as well.
- Attend an in-depth training webinar - Sign up for one of our weekly training webinars OR watch a recorded version here. These weekly sessions offer you the opportunity to attend a one hour deep-dive into all areas of BrightGauge. You’ll learn about datasources available, data syncing, dashboards, automated reports, goals, and more!
- Create an inventory of what’s already in your BrightGauge - Get organized by creating a log of all users, including viewers, and take note of the dashboards, scheduled reports, and gauges you have built and are actively using. You may reference what comes standard with each datasource through looking it up in our Knowledge Base, and scrolling to the end of the corresponding article.
We recommend creating a spreadsheet or using your internal documentation tool to get organized. Be sure to note which team or process would reference that item, frequency of use, definition, and how often it should be updated or referenced.
For a great example of organizational bliss, check out this user showcase webinar with Justin Bryant of CSpire on Starting a Service Library: watch the video here.
Pro tip: If the account is just too much of a mess, with many of the default dashboards and reports modified from their original version, reach out to support@brightgauge.com. We'll be happy to push out a new set of defaults to your account. - Delete what’s not in use - Let’s face it, we’re all guilty of hoarding something seemingly valuable to us. If it was created more than 6 months ago and you’re not using it, get rid of it!
Pro tip: On the left-hand side of your gauges overview page, click ‘Unused Gauges’ to get a sense of what you can delete. Read more cleanup tips here. - Meet with stakeholders to align on objectives, discuss use cases, and come up with actions you'd like to see as a result of your BrightGauge use.
- We're here to help! Setup a one-on-one training with a BrightGauge Success team rep. Book your new admin training here.
After you’ve organized and cleaned your account and have a general idea of how you’d like to use BrightGauge, it’s time to get formal about your objectives. Map out what is actionable and where you would like to make organizational change and improvements.
Turn to “IDEAS”, then keep it “SMART”.
IDEAS is a framework for setting key performance indicators (KPIs).
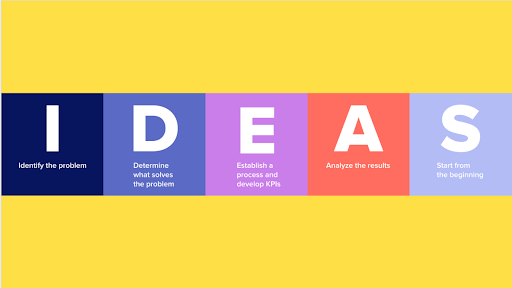
- What is the problem that you want to solve? Or what do you want to prevent from happening? By starting here, you can tie metrics directly to your desired outcomes.
- Now that you’ve identified your issues, what are the indicators that might mean progress towards a solution? For example, if you’re looking to improve Customer Satisfaction (CSAT) scores, maybe Average Time to Response is a metric that’ll help you make progress.
Establish your KPIs
- Knowing your issues and what can help you solve them is how you’ll determine the KPIs that are right for your business. At this point, consider where you’ll find the data you need (i.e. what tools can help you track your data?).
Analyze the results
- Now that your data is in, it’s time for a gap analysis. How do your actual results compare against benchmarks you’ve set? Where can you fill in the gaps? Perhaps you need a change in processes or to invest in additional training for your team members.
Start from the beginning
- The process of setting and tracking KPIs is ongoing. On a regular basis, you should assess your results, see what you can learn, and then start the process over.
With this framework in mind, you can begin to determine the KPIs that are going to drive each department, and your organization as a whole, towards success. To reach those KPIs, it’s important to set SMART goals.

Goals should be SMART (Specific, Measurable, Attainable, Relevant, and Time Based) so that it’s easier to track the progress of meeting that goal. If you’re in sales, it’s not enough to say, “next quarter, I want to close more accounts”. Instead, a SMART goal will be something like, “by the end of next quarter, I want to bring in 10 new accounts that will result in a higher commission for myself and will contribute to the overall revenue goals of our company; I’ll do this by increasing the amount of calls I make from 100 to 150”.
When you’re ready to start building
By now, you’re probably ready to start building. By all means, go for it! But do keep in mind these last few tips so you can keep your account clean and tidy.
- Map out the key metrics you’d like to measure by team and individual, and how to make them actionable. Check out this great user webinar that goes into setting expectations with baseline metrics and naming conventions.
- Plan for your data. List out what you’d like to see on one or multiple dashboards, reports, and goal lists. Think short term and long term, and proactive versus reactive KPIs.
- Use what’s already built. All integrations in BrightGauge come with pre-built dashboards and gauges and report templates. Check out what’s automatically available to you before trying to build something that may already be there.
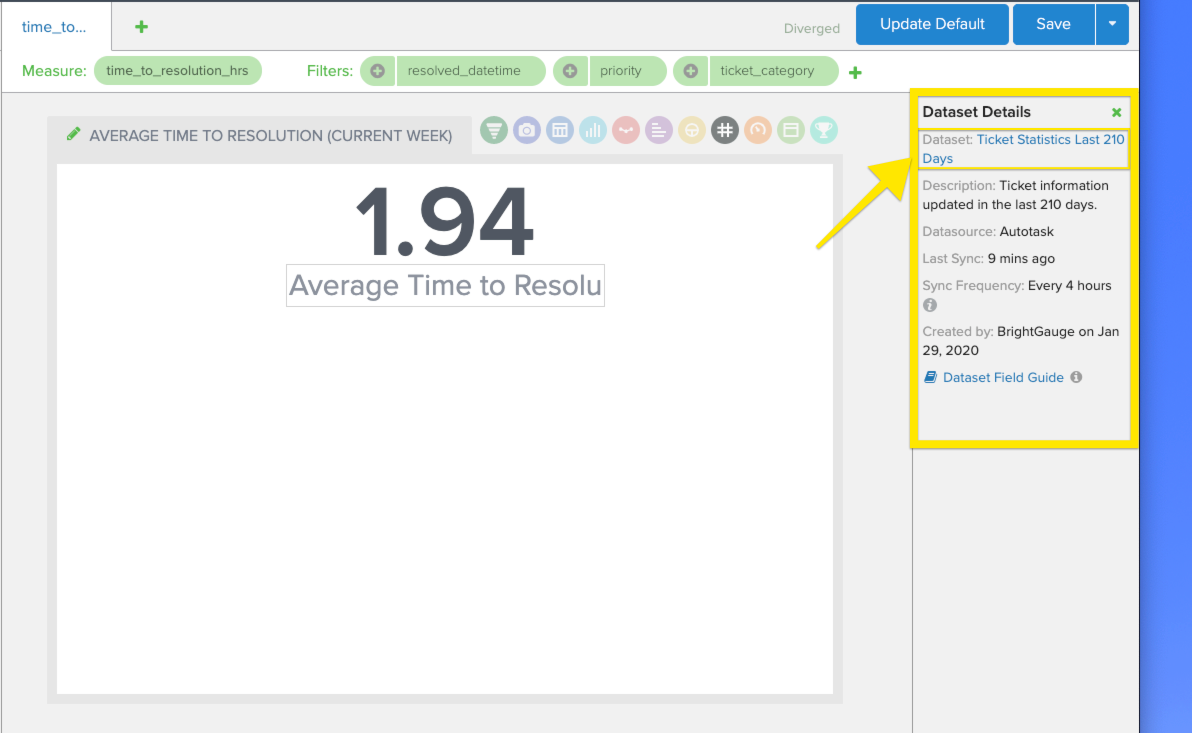
Pro tip: If the data doesn’t look quite right, you may just need to apply a filter. Always apply a filter at the dashboard or report level before cloning a gauge. This will help keep your account accurate, clean, and organized. All dashboard and report filters override what you have set at the gauge level; keep this in mind as you work with date ranges. - Check data accuracy. Make sure you’re using the right dataset. If you’re looking at ticket stats for the last 30 days, check to see that you’re not working with one of our lighter datasets. When in the gauge builder, reference the right-hand column for a review of the time range you’re working within, sync frequency, and description. Click on the name of the dataset there to see the raw data coming in.
- Always be iterating. Consistently review where you are. It’s never too early, or too late, to evaluate and change course accordingly. This is especially the case with goal setting. If 3 weeks in you find that you’re far exceeding or falling short, adjust and keep a realistic view of where your team and you are at.
- Show off your work. You’re spending valuable time, effort, and money into building these gauges, dashboards, and reports, so put them to use! Incorporate your data into meetings, presentations, discussions with stakeholders, client visits, and more.
For more help, check out these go-to videos, webinars, and articles:
This post was written by Danielle, Partner Success Team Lead to BrightGauge. The Partner Success Team is focused on getting you the training and resources you need to help grow your business through team alignment and showing your value to clients. Still not sure of where to begin? Email success @ brightgauge.com.

Free MSA Template
Whether you’re planning your first managed services agreement, or you’re ready to overhaul your existing version, we've got you covered!